Build your Azure lab with DSC and validate it using Pester – 1/3
Here is another post about DSC & Pester.. Yes, because they are truly the perfect combo to work with. Just do you script and Pester will test everything you need for you 🙂 (I know i’m repeating myself…)
So let’s go build our lab. What is neeeded in order to build my lab:
- A domain controller
- A filer
- A Pull Server
- 2-3 clients in order to test our Pull server is doding good
So let’s start by the main part that is building the VM infrastructure. Microsoft released while ago a DSC Resource for Azure, which is called xAzure. This module needs the Azure SDK available on your server installed before using it. You can follow the full process to install it here !
Now, installing the xAzure resource.
Install-Module xAzure
Nothing really difficult here 😉
So, let’s check what we can do with this resource !
Get-DscResource | ? Module -li "*Azure*"
 We have everything needed to build the lab.
Authentication
In order to build our VMs, we need of course to be connected to our account, so the first thing to do is to get the .publishedsetting file. To find it, you just have to run a little cmdlet
Get-AzurePublishSettingsFile
Once you are logged with your Azure account, register the published file.
Now let’s have a look about how use the xAzureSubscription resource. As always, Get-DSCResource is your friend !
Get-DscResource xAzureSubscription -Syntax
PS C:\Windows\system32> Get-DscResource xAzureSubscription -Syntax
xAzureSubscription [string] #ResourceName
{
    AzureSubscriptionName = [string]
    [ AzurePublishSettingsFile = [string] ]
    [ DependsOn = [string[]] ]
    [ Ensure = [string] { Absent | Present }  ]
}
So we have to find the Azure Subscription Name, it’s the only thing we don’t have a clue what it is… In order to do this, we need to authenticated ourself to the portal using powershell cmdlets and list all our subscriptions.
Import-AzurePublishSettingsFile -PublishSettingsFile E:\Scripts\Subscription.publishsettings
Id          : 35034310-d309-4bff-8c85-86b74b709ca6
Name        : Visual Studio Ultimate avec MSDN
Environment : AzureCloud
Account     : 6270C4BAE6A192A4EE921438642E1BEFAA8FA3C4
Properties  : {[SupportedModes, AzureServiceManagement], [Default, True]}

Id          : 35cdbe2b-4af4-475f-b141-f313c24882aa
Name        : Consommation sur la plateforme Windows Azure
Environment : AzureCloud
Account     : 556875CA2F5986DE670051A2CB201963BD19B049
Properties  : {[SupportedModes, AzureServiceManagement]}
Now we have the name of our subscriptions
Ok so let’s build our dsc block for authentication.
Configuration AzureLab {

    Import-DscResource -ModuleName xAzure

    Node localhost {

        xAzureSubscription PWRSHELLDOTNET {
            Ensure = 'Present'
            AzureSubscriptionName = 'Visual Studio Ultimate avec MSDN'
            AzurePublishSettingsFile = 'E:\Scripts\Subscription.publishsettings'
        }

    }

}

Set-Location E:\Scripts\
Subscription
Configure your subscription
In order to get our VMs working together we need to get them on the same network with static ip addresses. But right now this is not the question. We’ll configure affinity group and create the associated service.
Once again, let’s use our good old friend Get-DscResource to check the correct syntax !
Get-DscResource xAzureAffinityGroup -Syntax
xAzureAffinityGroup [string] #ResourceName
{
    Location = [string]
    Name = [string]
    [ DependsOn = [string[]] ]
    [ Description = [string] ]
    [ Ensure = [string] { Absent | Present }  ]
    [ Label = [string] ]
}
So in order to create an affinity group, we’ll need at least the location and the name of the affinity group !
The affinity location can be one of these values:
Get-AzureLocation | Select Name
Name
----
West Europe
North Europe
East US 2
Central US
South Central US
West US
East US
Southeast Asia
East Asia
Japan West
Japan East
So let’s build the resource block…
xAzureAffinityGroup Affinity {
    Ensure = 'Present'
    Name = 'AffinityGroupName'
    Location = 'AffinityGroupLocation'
    Label = 'AffinityGroupLabel'
    Description = 'AffinityGroupDescription'
    DependsOn = '[xAzureSubscription]Subscription'
}
Once the affinity group is created, in order to build our VMs we need to create a service to attach it on the affinity group. Note that we use DependsOn to guarantee the orchestration of resources execution.
xAzureService Service {
    Ensure = 'Present'
    ServiceName = 'ServiceName'
    AffinityGroup = 'AffinityGroupName'
    Label = 'ServiceLabel'
    Description = 'ServiceDescription'
    DependsOn = '[xAzureStorageAccount]Affinity'
}
Create Virtual Machines
Now it’s time to create our virtual machines. Ok, let’s go to see what we need to build our stuff.
Get-DscResource xAzureVM -Syntax
xAzureVM [string] #ResourceName
{
    ImageName = [string]
    Name = [string]
    ServiceName = [string]
    StorageAccountName = [string]
    [ Credential = [PSCredential] ]
    [ DependsOn = [string[]] ]
    [ Ensure = [string] { Absent | Present }  ]
    [ ExtensionContainerName = [string] ]
    [ ExtensionFileList = [string] ]
    [ ExtensionScriptName = [string] ]
    [ InstanceSize = [string] ]
    [ Linux = [bool] ]
    [ Windows = [bool] ]
}
So, we need the vhd image, the service name and the affinity group name. But in order to get our Windows customized, let’s specify too the credential, and force it to Windows OS.
Let’s first focus about how get the images available for the affinity group location.
Get-AzureVMImage | ? { ($_.ImageName -like "*Windows*2012*R2*") -and ( $_.Location -like "*West US*")} | Select ImageName
ImageName
---------
a699494373c04fc0bc8f2bb1389d6106__Windows-Server-2012-R2-201410.01-en.us-127GB.vhd
a699494373c04fc0bc8f2bb1389d6106__Windows-Server-2012-R2-201411.01-en.us-127GB.vhd
a699494373c04fc0bc8f2bb1389d6106__Windows-Server-2012-R2-201412.01-en.us-127GB.vhd
ad072bd3082149369c449ba5832401ae__RdshOnWindowsServer2012R2.20140305.127GB.vhd
ad072bd3082149369c449ba5832401ae__Windows-Server-RDSHwO13P-on-Windows-Server-2012-R2-20140421-1748
ad072bd3082149369c449ba5832401ae__Windows-Server-RDSHwO13P-on-Windows-Server-2012-R2-20140502-1817
ad072bd3082149369c449ba5832401ae__Windows-Server-RDSHwO13P-on-Windows-Server-2012-R2-20140509-1817
ad072bd3082149369c449ba5832401ae__Windows-Server-RDSHwO13P-on-Windows-Server-2012-R2-20140512-2037
ad072bd3082149369c449ba5832401ae__Windows-Server-RDSHwO13P-on-Windows-Server-2012-R2-20140514-1702
ad072bd3082149369c449ba5832401ae__Windows-Server-RDSHwO13P-on-Windows-Server-2012-R2-20140606-1902
ad072bd3082149369c449ba5832401ae__Windows-Server-RDSHwO13P-on-Windows-Server-2012-R2-20140814-1846
ad072bd3082149369c449ba5832401ae__Windows-Server-RDSHwO13P-on-Windows-Server-2012-R2-20140910-2215
ad072bd3082149369c449ba5832401ae__Windows-Server-RDSHwO13P-on-Windows-Server-2012-R2-20141111-2335
ad072bd3082149369c449ba5832401ae__Windows-Server-RDSHwO365P-on-Windows-Server-2012-R2-20141121-0016
ad072bd3082149369c449ba5832401ae__Windows-Server-RDSHwO365P-on-Windows-Server-2012-R2-20141126-2055
ad072bd3082149369c449ba5832401ae__Windows-Server-Remote-Desktop-Session-Host-on-Windows-Server-2012-R...
ad072bd3082149369c449ba5832401ae__Windows-Server-Remote-Desktop-Session-Host-on-Windows-Server-2012-R...
ad072bd3082149369c449ba5832401ae__Windows-Server-Remote-Desktop-Session-Host-on-Windows-Server-2012-R...
bd507d3a70934695bc2128e3e5a255ba__RightImage-Windows-2012-x64-sqlsvr2012-v13.5
bd507d3a70934695bc2128e3e5a255ba__RightImage-Windows-2012-x64-sqlsvr2012-v14
bd507d3a70934695bc2128e3e5a255ba__RightImage-Windows-2012-x64-sqlsvr2012ent-v13.5
bd507d3a70934695bc2128e3e5a255ba__RightImage-Windows-2012-x64-sqlsvr2012ent-v14
ad072bd3082149369c449ba5832401ae__Windows-Server-RDSHwO13P-on-Windows-Server-2012-R2-20140417-1824
ad072bd3082149369c449ba5832401ae__Windows-Server-Remote-Desktop-Session-Host-on-Windows-Server-2012-R...
Ok, now we have our vhd list, now time to add the last blocks to our configuration
Configuration AzureLab {

    param (
        [PSCredential]$Credential = (Get-Credential)
    )

    Import-DscResource -ModuleName xAzure

    Node localhost {

        xAzureSubscription PWRSHELLDOTNET {
            Ensure = 'Present'
            AzureSubscriptionName = 'Visual Studio Ultimate avec MSDN'
            AzurePublishSettingsFile = 'E:\Scripts\Subscription.publishsettings'
        }

        xAzureAffinityGroup Affinity {
            Ensure = 'Present'
            Name = 'AffinityGroupName'
            Location = 'AffinityGroupLocation'
            Label = 'AffinityGroupLabel'
            Description = 'AffinityGroupDescription'
            DependsOn = '[xAzureSubscription]Subscription'
        }

        xAzureService Service {
            Ensure = 'Present'
            ServiceName = 'ServiceName'
            AffinityGroup = 'AffinityGroupName'
            Label = 'ServiceLabel'
            Description = 'ServiceDescription'
            DependsOn = '[xAzureStorageAccount]Affinity'
        }

        xAzureVM PWRSHLLVM001 {
            Ensure = 'Present'
            Name = 'PWRSHLLVM001'
            ImageName = 'a699494373c04fc0bc8f2bb1389d6106__Windows-Server-2012-R2-201409.01-en.us-127GB.vhd'
            ServiceName = 'ServiceName'
            StorageAccountName = 'AffinityGroupName'
            Windows = $True
            Credential = $Credential
            InstanceSize = 'Medium'
            DependsOn = '[xAzureService]Service'
        }

        xAzureVM PWRSHLLVM002 {
            Ensure = 'Present'
            Name = 'PWRSHLLVM002'
            ImageName = 'a699494373c04fc0bc8f2bb1389d6106__Windows-Server-2012-R2-201409.01-en.us-127GB.vhd'
            ServiceName = 'ServiceName'
            StorageAccountName = 'AffinityGroupName'
            Windows = $True
            Credential = $Credential
            InstanceSize = 'Medium'
            DependsOn = '[xAzureService]Service'
        }

        xAzureVM PWRSHLLVM003 {
            Ensure = 'Present'
            Name = 'PWRSHLLVM003'
            ImageName = 'a699494373c04fc0bc8f2bb1389d6106__Windows-Server-2012-R2-201409.01-en.us-127GB.vhd'
            ServiceName = 'ServiceName'
            StorageAccountName = 'AffinityGroupName'
            Windows = $True
            Credential = $Credential
            InstanceSize = 'Medium'
            DependsOn = '[xAzureService]Service'
        }

        xAzureVM PWRSHLLVM004 {
            Ensure = 'Present'
            Name = 'PWRSHLLVM004'
            ImageName = 'a699494373c04fc0bc8f2bb1389d6106__Windows-Server-2012-R2-201409.01-en.us-127GB.vhd'
            ServiceName = 'ServiceName'
            StorageAccountName = 'AffinityGroupName'
            Windows = $True
            Credential = $Credential
            InstanceSize = 'Medium'
            DependsOn = '[xAzureService]Service'
        }
    }
}
Validate your created infrastructure with Pester
Once your configuration is applied, this Pester script will help you validate your infra. In order to do this, just create a script named Azure_Lab.tests.ps1, and copy/past this in the script
Describe "Validate your Azure infra" {

    It "Test if Affinity group is created" {
        Get-AzureAffinityGroup -Name <Affinity_group> | Should Not be $null
    }

    It "Test if Service exists" {
        Get-AzureService -ServiceName <Service_name> | Should Not be $null
    }

    It "Test if PWRSHLLVM001 exists" {
        Get-AzureVM -Name PWRSHLLVM001 -ServiceName <Service_name> | Should Not be $null
    }

    It "Test if PWRSHLLVM002 exists" {
        Get-AzureVM -Name PWRSHLLVM002 -ServiceName <Service_name> | Should Not be $null
    }

    It "Test if PWRSHLLVM003 exists" {
        Get-AzureVM -Name PWRSHLLVM003 -ServiceName <Service_name> | Should Not be $null
    }

    It "Test if PWRSHLLVM004 exists" {
        Get-AzureVM -Name PWRSHLLVM004 -ServiceName <Service_name> | Should Not be $null
    }
}
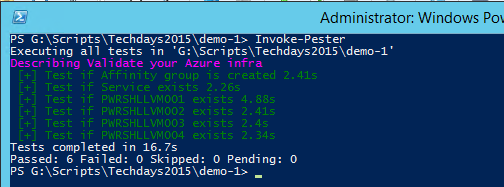
Now, navigate to the script folder, and do:
Invoke-Pester
And Tadaaaaaaa !
Well, that’s all for now, in the next part we’ll see all methods available to upload and execute script (DSC configuration) on target VMs.
Wish for you, your family and friends, all the best for next year!


Hey! Great post series. Looking forward the 3rd part
Thanks Dalmiro !
The third part is delayed due to French techdays, which take many of my free time 😉
You can excpect it for february end. And Maybe more than 3 parts.
Regards