Build your Azure lab with DSC and validate it using Pester – 2/3
After the first post of this series, we have now four virtual machines. The goal, now, is to apply Configurations.
In order to apply configurations, you must use at least Azure SDK 0.8.6. In order to validate if your version is compatible, you can try this command:
Get-AzureVMAvailableExtension -publisher Microsoft.PowerShell
This will permit to check if DSC extension is available. You must have a return like this one
Publisher                   : Microsoft.Powershell
ExtensionName               : DSC
Version                     : 1.5
Label                       : DSC
Description                 : PowerShell DSC (Desired State Configuration) Extension
PublicConfigurationSchema   :
PrivateConfigurationSchema  :
IsInternalExtension         : False
SampleConfig                : ICB7DQogICAgInB1YmxpY1NldHRpbmdzIjogew0KICAgICAgICAiTW9kdWxlc1VybCI6ICJodHRwczovLzx1cmwgdG8gY29uZmln...
ReplicationCompleted        : True
Eula                        : http://azure.microsoft.com/en-us/support/legal/
PrivacyUri                  : http://www.microsoft.com/
HomepageUri                 : http://blogs.msdn.com/b/powershell/
IsJsonExtension             : True
DisallowMajorVersionUpgrade : False
SupportedOS                 :
PublishedDate               : 11/19/2014 7:32:56 PM
CompanyName                 : Microsoft Corporation
If you don’t have this result, please try update your SDK catching the last one on github 😉
Create a storage container
A storage container is necessary if we want using a DSC resource to be fully automated when we deploy our virtual machine. In order to create a container we will use the Storage account created in the first post, create a storage key and build a storage context. Do not run, this is pretty easy, Look!
At first let’s look about what cmdlets we need
get-command -Module Azure | ? Name -li "*StorageKey"

Get-AzureStorageKey -StorageAccountName <sotrageaccountname>
As you see, you have a Primary and a secondary key, right now only the primary will be used to build our container.

As i said previously, a storage context is also needed in order to build our container. So, let’s use the marvelous cmdlet New-AzureStorageContext
$Key = Get-AzureStoragekey -StorageAccountName <storageAccount>
$Context = New-AzureStorageContext -StorageAccountName '<storageAccount>' -StorageAccountKey $Key.Primary
 Ok, all stuff is ready to create the container.
New-AzureStorageContainer -Name demopwrshelldotnet -Context $Context

Publish DSC Configuration
Our container is now available, so let’s build our DSC configuration in order to push it to our VMs. To show you the power of DSC on Azure, I’ll take a custom resource created by myself. Like that I’m sure this resource is not already available on .vhd listed for Windows Server 2012R2 !
First of all, let’s create the configuration, and only the configuration. There is no need to compile MOF and add Start-DSCConfiguration to the script
# Création configuration pour une configuration SNMP
Configuration Test {

    Import-DscResource -ModuleName cSNMP

    Node localhost {

        WindowsFeature SNMPService {

            Name = 'SNMP-Service'
            Ensure = 'Present'

        }

        WindowsFeature SNMPRSAT {

            Name = 'RSAT-SNMP'
            Ensure = 'Present'

        }

        cSNMPCommunity Community {

            Community = "Test"
            Right = "ReadOnly"
            Ensure = "Present"
            DependsOn = '[WindowsFeature]SNMPRSAT'
        }
    }
}
Ok, so as i said before we used here a custom resource in our DSC configuration script. Now it’s time to publish it to our created container.
Publish-AzureVMDscConfiguration -ConfigurationPath G:\Scripts\DSC_SNMP.ps1 -StorageContext $Context -ContainerName demopwrshelldotnet
Nothing really difficult here, want to take a look at what we have uploaded ?
Get-AzureStorageBlob -Context $Context -Container demopwrshelldotnet

Let’s take a look about what is stored in this zipped file ! We can’t take a look like that on the blob, but we could archive the published file.
Publish-AzureVMDscConfiguration -ConfigurationPath G:\Scripts\DSC_SNMP.ps1 -ConfigurationArchivePath 'G:\Scripts\DSC_SNMP.ps1.zip'

Our needed custom resource is here, as well as our ps1 file !
Apply a DSC extension
When you create an Azure virtual machine, here how you can apply a DSC Configuration.
$VM = New-AzureVMConfig -Name "Tetest035" -InstanceSize Small -ImageName "a699494373c04fc0bc8f2bb1389d6106__Windows-Server-2012-R2-201412.01-en.us-127GB.vhd"
$VM = Add-AzureProvisioningConfig -VM $VM -Windows -AdminUsername "Administrateur" -Password "P4ssw0rd!"
$VM = Set-AzureVMDSCExtension -VM $VM -StorageContext $Context -ContainerName demopwrshelldotnet -ConfigurationArchive "DSC_SNMP.ps1.zip" -ConfigurationName "Test"

New-AzureVM -VM $VM -ServiceName Service -WaitForBoot -AffinityGroup Affinity
Note the Set-AzureVMDSCExtension cmdlet used to apply the Test configuration in our script.
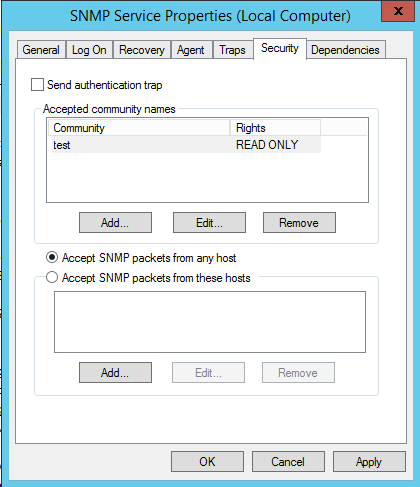
The VM is now deployed with SNMP configured like show in the screenshot bellow !
Ok this is all for today. In the last article of this series, we’ll see how deploying our Active Directory and other Lab’s VM. We’ll also see how we can use Pester to validate everything so easily!
So, stay tuned and feel free to comment!